!-- Start of shorte.st banner code by vishal-->
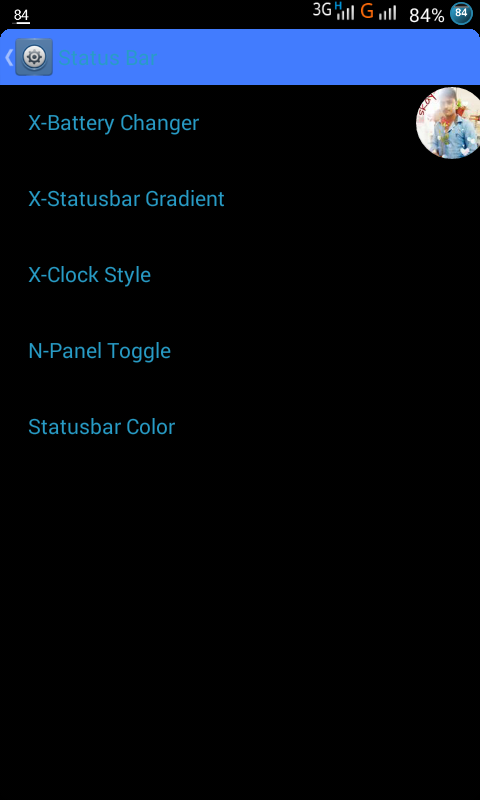
ROM'S SCREENSHOT ARE IN BELOW
****FEATURES OF THE ROM *******
1. TRANSPARENT AND AWESOM UI
2. TRANSPARENT UI
3. X-BATTERY MODE
4. X- STATUS BAR TWEAKS
5. X- STATUS COLOUR CHANGER
6. AWESOM ANIMATION
7. SOUND QUALITY IS JUST FAB....
8. COMPLETE 2-3 CIRCLES BATTERY WILL BE BETTER ABOUT 7½ HOURS
9. CUSTOMIZED APPS
10. TRAILED APPS VIEW
11. MODED SETTINGS .APK
12. ADDED ORIGINAL ROM MAKER NAME
13. 360+ THEMES
14. NO LAGS AT ALL
15. ADDED DPS MANAGER_VIPER4X
16. XPOSED WORKING
17. CAMERA IS BETTER
18. ANDROID 5.0 LOLIPOP
19. YOU CAN EDIT EVERYTHING
20. DISCOVER YOURSELF
BUGS:-- STILL NO BUGS FOUND.. IF YOU? COMMENT HERE
WHOLE PORTING_CUSTOMIZING CREDITS :- ME (VISHAL KAUSHIK)

link for rom :--- DOWNLOAD

I knew the code to be added, but I was adding it in wrong file, then i figured it out and mod was complete

I looked back and remembered that Sniper Killer suggested me to try custom layout and smali editing. I knew, it was nothing to do with smalis, duh. Just a simple ImageView Tag it was. But the Custom Layout thing was true

Guide

1. Download the SettingsSource.zip

2. Decompile your Settings.apk

3. Extract contents of SettingsSource.zip to respective folders in Settings.apk

4. Open /res/xml/device_info_settings.xml

You'll see several <Preference android:title tags

Add this just a line above the first Preference tag:

Code:
<PreferenceCategory android:layout="@layout/areebisawesome" android:key="blah" android:title="" />
Finally, it will look like this

Code:
<?xml version="1.0" encoding="utf-8"?>
<PreferenceScreen android:title="@string/about_settings"
  xmlns:android="http://schemas.android.com/apk/res/android">
    <PreferenceCategory android:layout="@layout/areebisawesome" android:key="blah" android:title="" />
    <Preference android:title="@string/model_number" android:key="device_model" android:summary="@string/device_info_default" style="?android:preferenceInformationStyle" />

Save the file

5. Now,go to /res/drawable/

There, you'll see cosmic.png Change it to any png of size 320x200 You can change this size description in /res/layout/areebisawesome.xml

6. Recompile the apk

7. Enjoy

Preview in the last.. ;)


SettingsSource.zip

And if you want a method for changing the image on clicking, my I found a very easy to follow way for that :

http://forum.xda-developers.com/show...1&postcount=36

Like us on facebook link:--

Http://www.facebook.com/micromaxu2


Source :- xda

Thanx to:- me (vishal kaushik)


Soft Brick vs Hard bricked vs Broken of an Android device
and repair your own device
Soft Brick:
Soft brick is the state of android device which occur due to some software problems like boot loops or phone freezing at some point during boot. This only occurs if some software problem occurred in the device mainly during OS upgrade or ROM flashing.

If your device is in such state then you are luck there are 99% chances that you can recover your beloved device without needing any professional help or spending hundred of dollars. Just follow those steps
http://www.micromaxunite2.net/2014/09/how-to-flashrestore-stock-rom.html

Hard Brick
Hard brick is the state of android device that occurs when your device won’t boot at all i.e. no boot loop,no recovery and also not charging. This occurs due to trying to flashed firmwere not made for your device or flashed incorrectly. This is more difficult to resolve and often require professional help.

in MTK Android there is many Partitions in your phone. like Preloader, Recovery, Bootimg etc….. if somehow Preloader get Corrupted then you phone will not able to DETECT WITH PC !!! in other words you will have phone with BOOT DEAD.

How Preloader get corrupted ?
There could be few reasons but main reason could be that someone or you Flash your complete phone (include Preloader) with wrong files or with wrong ver. Also there could be reason someone Delete Preloader or you Deleted.

How could i know my phone have preloader dead ?

Preloader can be dead if some one Flash it wrong and after flash your mobile will not detect with pc any more. for confirm
1.sp flash tools does not detect your phone anymore and also the computer does not as there is a pop sound when usb is connected to device
2.open device manager
take battery out from phone
insert usb
insert battery
and check is computer detecting any device

If it’s not detect then you have phone which Preloader is dead AKA Boot Dead

How can i repair it ?
requirement
1.screwdriver (by which you can open the screw from handset)
2.bricked device
3.a usb cable
4.a copper wire( for sold test points)
5.a pc with sp flash tool,mtk drivers and stock firmwere for your mobile

now you have to disassemble your phone and take pcb out. check there should be some Golden points. check these points there should be written on them Rx,Tx,GND,Vcc,Vcharge etc… check there should be written “COLO” or “KOLO” or“KCOLO” you have to Sold that point with GND After Sold Attach usb now your phone will detect with USB !! and now ready to Flash.
In some phones “COLO” or “KOLO” or “KCOLO” not written for those type of phones you have to test all points one by one Short Golden point with GND and attach usb cable which point short with gnd can able to detect your phone by pc isForce Preloader Mode Test Point !! Keep in mind Don’t Short Vcc,Vcharge or any other pin which have 4.x Volts also i had tested “Colo” or “Kolo” or “KCOLO” don’t have any kind of volts.

hear the two images are taken from 2 different device for identifying the GND and COLO OR KOLO OR KCOLO points
See below for images :) tx for visit

Broken
Broken Broken is a state of android device that occurs when any hardware component of device break down. This may occur due to electrical over charge, device dropped, water spilled etc. This require the electrical component being repaired or replace and does not occur due to any non supported software installation.

Credits: Me (vishal) https://www.facebook.com/micromaxu2
data and the images are collected from google and TELECOM INOX (Mobile&Laptop Repairing Training Institute)

like us on facebook :)


What is updater-script?

updater-script is a file written in edify script language which instructs the recovery to perform certain tasks.
updater-script is located in /META-INF/com/google/android/updater-script in flashable zip
Some basic rules:

Every statement must end with a semicolon (;)
Comments must start with #
Strings must be delimited by double quotes (” “)
Functions used:

ui_print(” “) – Prints string enclosed in double quotes. You can write anything between double quotes.
Example: ui_print(“Formatting partitions…”); will display Strings between double quotes i.e. Formatting partitions…

show_progress(fraction, seconds) – Shows progress bar over a period of seconds. Use 3.14 in fraction and total seconds required to complete flashing in seconds.
Example: show_progress(3.14, 100); will advance progress bar from 0% to 100% in 100 seconds. If flashing takes 20 seconds to finish then use 20, if it takes 200 seconds then use 200.

format(“filesystem”, “partition_type”, “device”) – Used to format a specified partition. Use MTK droid tools -> Block maps to see block details of your phone.
Example: format(“ext4″, “EMMC”, “/dev/block/mmcblk0p5″); will format /system partition. Every phone may have different filesystem, partition type, device. Here ext4 is the filesystem type, EMMC is partition type and /dev/block/mmcblk0p5 is the  device.

mount(“filesystem”, “partition_type”, “device”, “mountpoint”) – Used to mount a specified partition.
Example: mount(“ext4″, “EMMC”, “/dev/block/mmcblk0p5″, “/system”) will mount /system partition.

delete(“file_path”) – Used to delete an individual file where file_path is the location of the file which is to be deleted.
Example: delete(“/system/app/Music.apk”); will delete Music.apk from /system/app directory.

delete_recursive(“folder_path”) – Used to delete all files from a directory. It will delete the directory too.
Example: delete_recursive(“/system/etc/bluetooth”); will delete bluetooth directory from /system/etc.

package_extract_file(“source”, “destination”) – Used to extract individual file.
Example: package_extract_file(“logo.bin”, “/dev/logo”); will extract logo.bin file to /dev directory with name logo. Here logo.bin is source path in flashable zip and /dev/logo is destination path in device.

package_extract_dir(“source”, “destination”) – Used to extract all contents from source directory in flashable zip to the destination directory. Example: package_extract_dir(“system”, “/system”); will search for system folder in root of zip and copy all contents from system folder to the /system partition.
set_perm(uid, gid, mode, “file_path”) – Used to set permission for an individual file. Here uid denotes user id, gid denotes groud id and mode is the permission to be set to the file.
Example: set_perm(0, 0, 0644, “/system/priv-app/SystemUI.apk”); will set permission rw- r– r– for SystemUI.apk.

set_perm_recursive(uid, gid, dirmode, filemode, “directory_path”) – Used to set permission to the files and folders present inside specified folder.
Example: set_perm_recursive(0, 0, 0755, 0644, “/system”); will set permission rwx r-x r-x to all the folders present inside /system and rw- r– r– permission to all the files present inside /system.
r stands for read permission
w stands for write permission
x stands for execute permission
Octal values:
1 : –x
2 : -w-
3 : -wx
4 : r–
5 : r-x
6 : rw-
7 : rwx
You can use root explorer app to see permissions of any file or directory.
Default permission for /system partition and /data/app directory is set in flashable zip provided above.
write_raw_image(“file_path”, “filename”) – Used to write an image file to the device (/dev).
Example: write_raw_image(“/tmp/boot.img”, “bootimg”) will write boot.img file from /tmp directory to /dev
unmount(“mountpoint”) – Used to unmount a specified partition.
Example: unmount(“/system”); will unmount /system partition.
Understanding and editing downloaded zip:
# UPDATER-SCRIPT PROVIDED BY VISHAL KAUSHIK
# FOR GUIDE

These lines are comments. Used for information only. Will be ignored by recovery.
ui_print(“”);

Print a blank line.
show_progress(3.14, 150);

Advance progress bar for 150 seconds. Considering flashing will take 150 seconds to finish.
ui_print(“—————-“);
ui_print(”   ROM NAME   /”);
ui_print(” VERSION NAME /”);
ui_print(“—————-“);
ui_print(“”);

Print —————- in 1st line,
ROM NAME in 2nd line
VERSION NAME in 3rd line
—————- in 4th line
and blank in 5th line.
ui_print(“Formatting partitions…”);
format(“ext4″, “EMMC”, “/dev/block/mmcblk0p5″);
format(“ext4″, “EMMC”, “/dev/block/mmcblk0p6″);
format(“ext4″, “EMMC”, “/dev/block/mmcblk0p7″);

1st statement will print Formatting partitions…
2nd statement will format /system partition where all system files are stored. Use this option only if you are flashing a new ROM. Don’t use in update.
3rd statement will format /cache partition.
4th statement will format /data partition where all user apps and data for user and system apps are stored. Don’t use in update.
ui_print(“Mounting partitions…”);
mount(“ext4″, “EMMC”, “/dev/block/mmcblk0p5″, “/system”);
mount(“ext4″, “EMMC”, “/dev/block/mmcblk0p7″, “/data”);

1st statement will print Mounting partitions…
2nd and 3rd statements will mount /system and /data partitions respectively.
Partitions must be mounted to delete old files and copy new files
ui_print(“Removing unneeded files…”);
delete(“file_path”);
delete_recursive(“folder_path”);

Replace file_path with the path of the file which you want to delete. Example: /system/app/Music.apk, /system/priv-app/Settings.apk, /data/app/com.whatsapp-1.apk, /system/bin/vold, etc.
Replace folder_path with the path of the folder which you want to delete. Example: /system/etc/bluetooth, /system/res, /data/dalvik-cache, etc.
ui_print(“Extracting files…”);
package_extract_dir(“data”, “/data”);
package_extract_dir(“system”, “/system”);

Use to push new files to /data partition and /system partition.
ui_print(“Setting permissions…”);
set_perm_recursive(1000, 1000, 0771, 0644, “/data/app”);
set_perm_recursive(0, 0, 0755, 0644, “/system”);
set_perm_recursive(0, 0, 0777, 0777, “/system/etc/init.d”);
set_perm_recursive(0, 2000, 0755, 0755, “/system/bin”);
set_perm(0, 3003, 06755, “/system/bin/ip”);
set_perm(0, 3003, 02750, “/system/bin/netcfg”);
set_perm(0, 3004, 02755, “/system/bin/ping”);
set_perm(0, 2000, 06750, “/system/bin/run-as”);
set_perm_recursive(1002, 1002, 0755, 0440, “/system/etc/bluetooth”);
set_perm(0, 0, 0755, “/system/etc/bluetooth”);
set_perm(1000, 1000, 0640, “/system/etc/bluetooth/auto_pair_devlist.conf”);
set_perm(1002, 1002, 0440, “/system/etc/dbus.conf”);
set_perm(1014, 2000, 0550, “/system/etc/dhcpcd/dhcpcd-run-hooks”);
set_perm(0, 2000, 0550, “/system/etc/init.goldfish.sh”);
set_perm_recursive(0, 0, 0755, 0555, “/system/etc/ppp”);
set_perm_recursive(0, 2000, 0755, 0644, “/system/vendor”);
set_perm_recursive(0, 2000, 0755, 0644, “/system/vendor/etc”);
set_perm(0, 2000, 0755, “/system/vendor/lib”);
set_perm(0, 2000, 0755, “/system/vendor/lib/hw”);
set_perm_recursive(0, 2000, 0755, 0755, “/system/xbin”);
set_perm(0, 0, 06755, “/system/xbin/su”);
set_perm(0, 1000, 0755, “/system/xbin/busybox”);

These are the permissions for /system partition and /data/app directory. You don’t need to add new permission for /system files. Just push files and correct permission will be set by above statements.
ui_print(“Flashing kernel…”);
assert(package_extract_file(“boot.img”, “/tmp/boot.img”),
          write_raw_image(“/tmp/boot.img”, “bootimg”),
          delete(“/tmp/boot.img”));

These lines will flash kernel/boot.img. Place boot.img in root of zip.
ui_print(“Flashing logo…”);
package_extract_file(“logo.bin”, “/dev/logo”);

This is used to flash new logo. Place logo.bin in root of zip.
ui_print(“Wiping dalvik-cache…”);
delete_recursive(“/data/dalvik-cache”);

Use to wipe dalvik-cache. Dalvik-cache must be wiped after flashing update to prevent force close.
ui_print(“Unmounting partitions…”);
unmount


#thanq_to_qamrul_and_me... :)

For any queries comment here

Like us on facebook too...

Http://www.facebook.com/micromaxu2


Hi guys this guide is about how to install xposed installer in Lollipop. This method will work on all firmware SC-update/Leaked Firmware/Titanium L/OTA lollipop.
Things you need:-
SP tool
Scatter File take from your firmware
All required files download :--

DOWNLOAD FROM BELOW IN LAST 


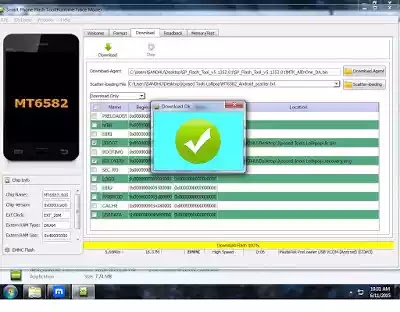
 For better understanding see screenshot in last... Tx for visit :)

Procedue to flash recovery:---
1) download All required file zip and extract zip file

2) now copy Scatter file from your firmware to this folder

3) download sp tool extract and launch . then select load scatter and choose scatter from this folder
4) check uboot.bin and recovery.img detected by sp tool and press Download button

5) Now switch off your phone . let it off properly and connect USB cable to phone and flashing will start, if not getting start then check your driver or try without battery

6) As completed you will get confirmation download ok, and disconnect phone

Procedure to install Xposed and GravityBox:-
7) Now copy these file to your phone which u downloaded in all required files…
xposed-sdk21-arm-20150430.zip
xposed installer.apk
gravity box LP.apk

8) now to to recovery mode by pressing power button+vol down and choose install zip file / flash below mentioned file
xposed-sdk21-arm-20150430.zip
9) it will take 5-10 minutes to boot according to your apps installed , be patent and wait till it boot normaly, it will boot 5-6 times during app up-gradation so don’t worry
10) As you phone booted install xposed installer and open framwork and u will see its installed

11) not install module active under module tab and enjoy

NOTE:- you will face Yellowish screen before boot logo and also reboot issue , so now u have to flash original ik.bin and any other recovery or stock recovery from your firmware.
Procedure to change recovery:-
1) open sp tool and load your firmware load scatter file
un-check all just select uboot.bin and recovery.img and click download and flash.
Dont select all file be alert and follow guide properly

thats it / any doubt u can ask me
Credits:-

download from here by Vishal


LIKE US ON FACEBOOK TOO
LIKE US FRM HERE


Next PostNewer Posts Previous PostOlder Posts Home