!-- Start of shorte.st banner code by vishal-->

unite 2 baap of phones

with whole new and stable miui 

T1p4d_Bv_T1RXrhCrK
MIUI 6 v6.6.2.0 Stable for Unite 2

Features:

Pre-Rooted
Dual 3G (Credits to Mr.Deliopoulos)
Themes Working Perfectly
500-550+mb RAM free
Online themes,wallpapers,ringtones,etc..
More Battery Efficient
Smooth (Very!)
Modded Dailer
Best Cam Quality (Thanks to Anup)
Chinese apps removed, most apps in English
Internal+SD Card mount as MTP
for USB storage use app provided
Only Limitation is Overlapping Icons that i tried but couldnt fix wiothout it causing many more problems, but it is easy to fix, just drag the icons up.
I dont think i need t elaborate much on MIUI
Thanks for your support on my first ROM Guys, i appreciate every request, compliment, complain, abuse and joke towards me. Thank you so much !
INSTRUCTIONS:
1. Place ROM is SD Card
2. Reboot to Custom Recovery (CTR v3 Recommended)
3. Wipe Data, Cache & Dalvik Cache
4. Go to Install Zip & Select MIUI and start Flashing
5. It will take some time so be patient
6. After Flashing Complete, Wipe Dalvik Cache.
7. Reboot, first Reboot takes around 4 mins approx
8. Go Through initial setup, when in homescreen, swipe left and goto SuperUser app, open it, it will say to update binary, select OK and Normal Mode, it will take some time, then reboot
9. Open WSM Tools, click Install, then enable modules and Reboot.
10. Done

icon overlapping trick for miui 6
1)open app setting
2)search for system launcher
3)click on launcher then in DPI give value 180 and tap on save button that’s it

1611009_1466309567030695_1625942647504697813_n
credits:
Vijay Jaiswal MJ Anand Raju Krishna Śḥīvā Śāī Subhankar Das Subho John Kanti Deb Ayan Chakraborty Ajay C Jambure Attitutic Tosha Paras Jasal Albert Anne Dragneel

liked our work>?

like us on facebook from :- here

***Friends... In many custom roms.. Sometime when we download such apps from play store its shows "your device isn't compatible with this app" n u can't able to download a particular app from play store.. Because there is no install button.. N its shows incompatibilitiy for ur device...***

##Then there is a solution... Just download #

*Market Helper
*Android device Manager

##After downloading of Market Helper just open it ..... ##

1) Tap on (Select device) n chose "phone" n any high end smartphone name ... Like in above scrnshot i was selected S3....

2) Then Tap on - Select Operator - chose (united state )

3) Finally Tap on "Activate"
[Don't Reboot Device]

* Open Android Device Manager ... Login n wait for name show to be... If its shown S3 or which u was selected then done...*

*Again open Play Store n search for a partucular app which was not compatible with ur device.. *

**Now u will se there is a option to install .**

:) Enjoy
‪#‎ViSHAL_SINGH‬


ss are in below


Here is my attempt at a No0b's guide to using basic Titanium features of backing up and restoring. Let's face it this program does so many things but me, for one, I just use the basic functions, so if there are some "Super users" out there please come forward and share your knowledge!

Getting started, I'm using the PRO version so if you are only using the FREE version your guide may be different.

From the user "Preferences" (Menu/Preferences) make sure that you change the "Max backup history to more than 1" this will allow you to have more than one back up version before the app overwrites the previous backup.... useful if you upgrade an app then realise that it was not such a good idea.

Another tip is that if you have a certain app that you want to retain the backup and user data for then you can simple go the the main app window, select the "Backup / Restore" button then tap on the app that you want to permanently keep a back up of, then tap on one of the backups, then select "Protect this backup". now this version of your back up will always be kept and never over written.

BACKING UP
Lets assume that you have installed Titanium Back up (PRO) and that you now need to make your first system and user apps back up. Then open the app and then press the icon at the top right of screen which looks like a page with a tick mark on it, then choose "Backup all user data + system data" from the list and hit the "RUN" button to the left of it. (Image #1). For backing up you are now done. (Note that if you are a frequent ROM flasher then you might only want to ever back up the USER APPS and data as restoring System apps across ROM is the main culprit of errors from using TItanium Backup. If you decide only to make user app back up then follow this by selecting the "Backup all system data" and on the next screen select the "Deselect all" button, next go through the list of system apps and select only the green coloured items (see below the list of system apps/settings that I recommend you ONLY restore across ROMS).

RESTORING after ROM change
After you have done a full wipe and then installed a new ROM you now want to RESTORE your applications and all of their user data, things like settings and user information. Titanium back up is an excellent tool for this but you MUST be careful not to restore any SYSTEM apps or data otherwise you can run in to trouble and it will cause many "FC's". According the the Official TB user guide: Again, if you’re restoring them from a different phone/ROM, enable the “System data migration” option (found under Menu/Preferences and half way down the screen list to the "Restoration Settings" section).

Then open the app and then press the icon at the top right of screen which looks like a page with a tick mark on it, then select BATCH and then scroll down to the RESTORE section and select "Restore missing apps with data". by default the "App+Data" will be checked, leave this option as is for this BATCH task (Image #3). Or you can review the list and manually Deselect one by one any apps that you did not want to restore on this occasion.

Or you can review the list and manually Deselect one by one any apps that you did not want to restore on this occasion. Or if you only want to restore a few of the apps then "Deselect All" and then manually add each app that you want to restore when you have completed your selections then hit the "Run the batch operation" button at the top. (Image #4).

It will take some time for the BATCH to run and re install all of your user installed apps. after the batch has completed then you are ready to install just a few of the other GREEN coloured items from the main menu.

This time from the main application window select the top middle "Backup / Restore" button. (Image #5). Now BE CAREFUL here, i ONLY RESTORE the following options and have never had any problems HOWEVER if you try to restore Accounts and Settings and some other green coloured items you can run in to trouble with FC's....you have been warned but test this out for yourself and report back if you have any success:

What to RESTORE safely:
Bluetooth pairings (User data only)
[Calandar] (User data only)
[Alarms] Clock (User data only)
[Desktop] HTC Sense (User data only) - NOTE it must be the same version as the previous ROM check the currently installed version against your last back up version number, if they match then you can restore and it will put back ALL your old desktop short cuts and screens (but NOT any of your widgets)....very handy one. (Image #12 & #13)
[Bookmarks] (User data only)
[User Dict HTC] (User data only)
[User Dict] (User data only)
Wi-Fi Access Points (User data only)

What NOT to Restore
Accounts
Application Widgets
[Contacts/Cal...]
Country, Language, Time zone
[SMS/MMS/APN...]
[E-Mail Accounts]
[Playlists]
[SMS/MMS Pref....]
[Voicemail]
[Wallpaper/Se...]
[Settings/Blu...]

You will now need to REBOOT your device for the system items to take effect.

Now a little tip that i use, as you will be updating your apps and settings will change almost daily why not set up the Schedule feature so that your apps and also your changed settings data are all backed up every night?

Here is how:
Open the application then select the top right button "Schedules" (Images #22-#24)
now enable the first option and select "Redo backups for modified data" select every day and also change the time to during the nighttime or other suitable time for you when you are not going to be using your phone.
Select the second option and change it to "Backup all new apps & newer versions" and again select the best time for yourself.

That's it, you are done so now you can rest assured that every night your current apps and user data will be backed up and ready for the next days flashing of new ROM's.

And one final tip that i use.........when setting up a ROM from scratch, do not sign in to the Google account until AFTER you have RESTORED all the user Apps with Titanium as the Market will try to restore all your apps from your Market user history, which is OK but will conflict with your BATCH RESTORE using TItanium Backup.

YOu should also make a copy of your installed version of Titanium Backup App to allow you to restore it on the new ROM without having to go to the Market for the reason detailed above. (Folder: /data/app/com.keramidas.TitaniumBackup-1.apk)

 enjoy. 

ss :-

Click image for larger version

Name: Image__1.jpg
Views: 2870
Size: 40.6 KB
ID: 1455531

Click image for larger version

Name: Image_2.jpg
Views: 2413
Size: 39.0 KB
ID: 1455545

Click image for larger version

Name: Image__3.jpg
Views: 2200
Size: 40.8 KB
ID: 1455547

Click image for larger version

Name: Image__4.jpg
Views: 1926
Size: 39.2 KB
ID: 1455548


Click image for larger version

Name: Image__22.jpg
Views: 1317
Size: 38.8 KB
ID: 1455554
Click image for larger version

Name: Image__5.png
Views: 1839
Size: 64.4 KB
ID: 1455549
Click image for larger version

Name: Image__13.jpg
Views: 1500
Size: 49.8 KB
ID: 1455553
Click image for larger version

Name: Image__24.jpg
Views: 1173
Size: 35.4 KB
ID: 1455556


READ FIRST!
Update 2 for Android M came out with a new Launcher.
The Launcher from the inital release of Android M Preview works fine, the one from Update 2 has bugs and on many devices Google App will constantly crash!Flash on your own risk!
Description:
I am proud to present to you the new Android M Launcher,Camera, Wallpaper, Bootanimation, Ringtones and more, extracted from the M Developer Preview.
I also recognized that the Android M Launcher runs smoother than the Android L one on my old S3 and S6 and first Google Now Launcher which doesnt lag on my S3. So it is definetelly worth to give it a try!
Features:
– Android M Launcher/Velvet
– Android M Camera -> Link removed, you find the App now in the Play Store!
– Android M Clock (can bring bugs!) -> Link removed, you find the App now in the Play Store!
– Android M Play Services [use on your own risks! This can bring bugs and more!]
– Android M Wallpaper (download at Screenshots!)
– Android M Bootanimation (it is very similar to the Lollipop one, maybe the same!)
– Android M Ringtones (Note: Nearly ever tone is the same as in Lollipop!)
– All Stock Nexus Android M Apps in one package (I wouldnt recommend to install all these apks, they are for tests, not more!)
All in One-flashable:
All in One will install all new Apps, Bootanimation and Ringtone while flashing once.
It will install: Velvet+libs; Camera+libs; Android M Clock; Bootanimation; Ringtones
How to install…
…new Google Now Launcher from M:
– Download my Google Now App (Velvet) below
– Download Google Now Launcher from Play Store…new Google Camera with lib files:
Download Google-Camera.apk and Google-Camera-lib-files.zip. Install the app and then put the lib files to the DeskClock folder in /system/app
Just download the App now from the Play Store!… Google Play Services
This will only work on Android 5.0 and above, also it won’t work on 64bit systems and it is recommended only to install if you have a 480 dpi device!
Just install the apk on your device.…new Android For Work App
Download Android-For-Work.zip, put the whole AndroidForWork folder in: /system/app and give the correct permissions
removed, doesnt work
… Android M Ringtones (note nearly all are the same as in Lollipop!)
Way 1: Download: Bootanimation-flashable.zip and flash it
Way 2: Download my Ringtone.zip and copy the files to system/media/audio to the correct folder
… all other Android M apps
Download Full-Android-M-App-Package.zip and place every app you like in the correct folder
How to install video (thanks to @NaldoTech)
https://youtu.be/OedmJo2RS5c
Video Review (thanks to: @polarworks )
https://youtu.be/OrfWnvTA3uU
More Videos about this thread:
– Android Version required: 4.4+ (inlcudes all Lollipop versions!)
– I have tested the App so far successfully on Android 5.0.2 (TouchWiz) and 5.1.1 AOSP
– ApkMirror has the Apps now also, after I made this post
– WARNING: As this is taken from Android M it still can have risks! Keep this in mind! It was originally made for Android M, not L. I am not responsible for bricked devices, or other things! YOU have decided to make these modifications!
– AOSP based Roms (CyanogenMod, Omni, etc) will have less bugs than Sense (HTC), TouchWiz, etc
Bugs:
– HDR+ will make the Camera App force close
– “Ok, Google” doesn’t work
– Android for Work won’t install, you have to put the apk and files in System folder
– new Android M Clock will force close on some devices!
Credit and Contribution:
-@ FaserF (xda) for this great post
– @polarworks for the great video review!
– @NaldoTech for the great how to install video!
– Awais Farooq for the modded Android M Wallpaper
-  me for bringing this post to you

and abhinav jain too


like us on facebook


join fb group for discussion


In this how to make TWRP tutorial, I will show you how to make a TWRP recovery on an already rooted phone.
What you will need
  1. MTK mobile
  2. A USB cable
  3. A PC
  4. The Easy Ultimate TWRP installer (Download links are in Stage 2)
Stage 1: Preparation
Some of these may or may not be required depending on what you have done so far. If you have:
  1. USB debugging enabled
  2. ADB drivers installed on PC
  3. Have stock firmware or a flash tool backup of your phone available
  4. Are rooted already
  5. NVRAM backed up
Then you can skip the following steps and head to the next stage. If any of these steps have not been completed, please see the following steps.
  1. Enable USB debugging on your MTK mobile phone
  2. Install ADB drivers on your PC if not already installed. This step is required so that your PC can communicate with your mobile phone. I recommend PDANet drivers available and that is what’s linked to here. You do not need to install the app on your phone, so once the PDANet drivers are actually installed on PC, you can quite the installer. If you have any issue with PDANet ADB drivers,there is also a pack available here with most every currently released driver installer. If you have Windows 8 or Windows 8.1 there is a tutorial here on some tips to get ADB drivers installed correctly.
  3. If stock firmware is not easily available for your phone, you will first want to backup your phone.Making any changes to your phone can brick it, so take this step seriously.
Stage 2: Create Magic Auto TWRP for your MTK Phone
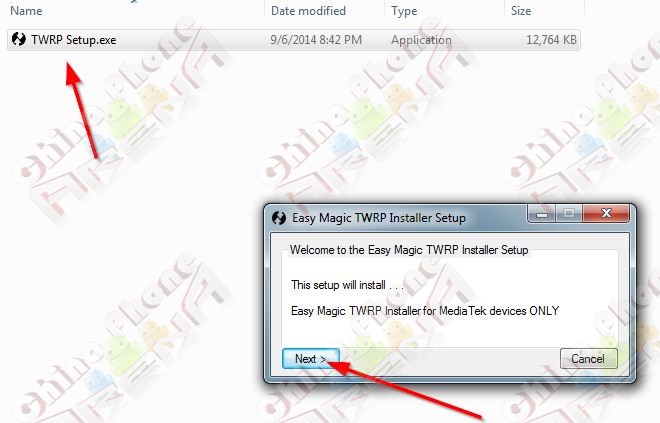
  1. Download, extract and run TWRP Setup.exe. There are two different versions, one is TWRP 2.7.1.0 (Download) and the other TWRP 2.8.1.0 (Download). For KitKat, I recommend 2.8.1.0. For older Jelly Bean devices, try 2.7.1.0 first.twrp_auto_magic--1
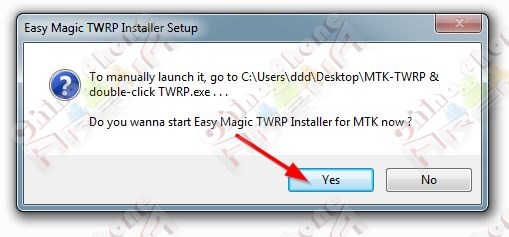
  2. After installing Easy Magic Auto TWRP, if you’re not ready yet, click “No”. Otherwise, go ahead and click “Yes”.
    twrp_auto_magic-0
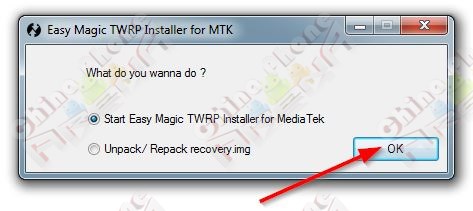
  3. If you see “What do you wanna do?”, or are starting the program from TWRP.exe, go ahead and click “OK” to start Easy Magic Auto TWRP.
    twrp_auto_magic-1
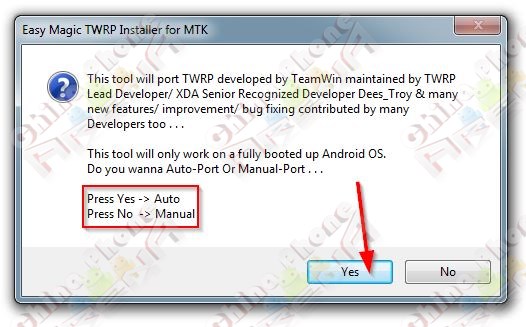
  4. The next screen that comes up will ask you if you want Auto or manual. At this point click “Yes” to Auto create the TWRP for your MTK6592 MT6572 MTK6582 MTK6595 device.
    twrp_auto_magic-2
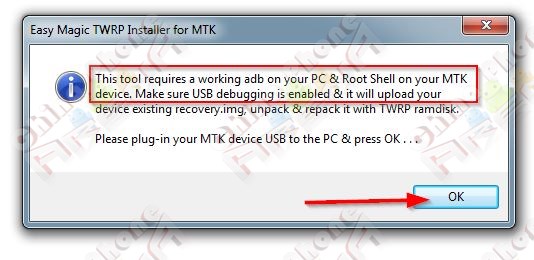
  5. You will then see a set of requirements for the tool. They are more or less what I went through in Stage 1 of this tutorial. Assuming you have completed all of the necessary prerequisites, go ahead and connect your powered on device to PC via USB and click “OK”
    twrp_auto_magic-3
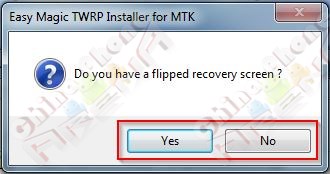
  6. You will then see a series of dialog boxes that tell you some things about your phone that you likely already know. You may get a dialog box that asks if you have a flipped recovery screen. Unless you know your recovery is coming up upside down, you will answer “No” to this.
    twrp_auto_magic-5
  7. During the install be very aware of root permission requests on your phone’s screen. You will want to allow any requests that come up.
  8. When the TWRP recovery has succesfully been made and pushed to your phone, you will then shut down and boot into recovery by holding the Power + VolUp (some phones are power button + VolDown) to make sure that all has completed successfully.
Next PostNewer Posts Previous PostOlder Posts Home